Assistants API Overview (Python SDK)

原文请去 link https://cookbook.openai.com/examples/assistants_api_overview_python
前言
Assistants API是Chat Completions API演变,旨在简化类似助手的体验的创建,并使开发人员能够访问强大的工具,如代码解释器和检索。
Chat Completions API 对比 Assistants API
Chat Completions API 的基本元素是Messages,我们可以在这些消息上使用模型(如 gpt-3.5-turbo、gpt-4 等)执行完成操作。它轻量且功能强大,但本质上是无状态的,这意味着我们需要手动管理会话状态、工具定义、检索文档和代码执行。
评论:比如说我们说到的每次要新建一个空列表,然后每次吧所有的对话历史上传
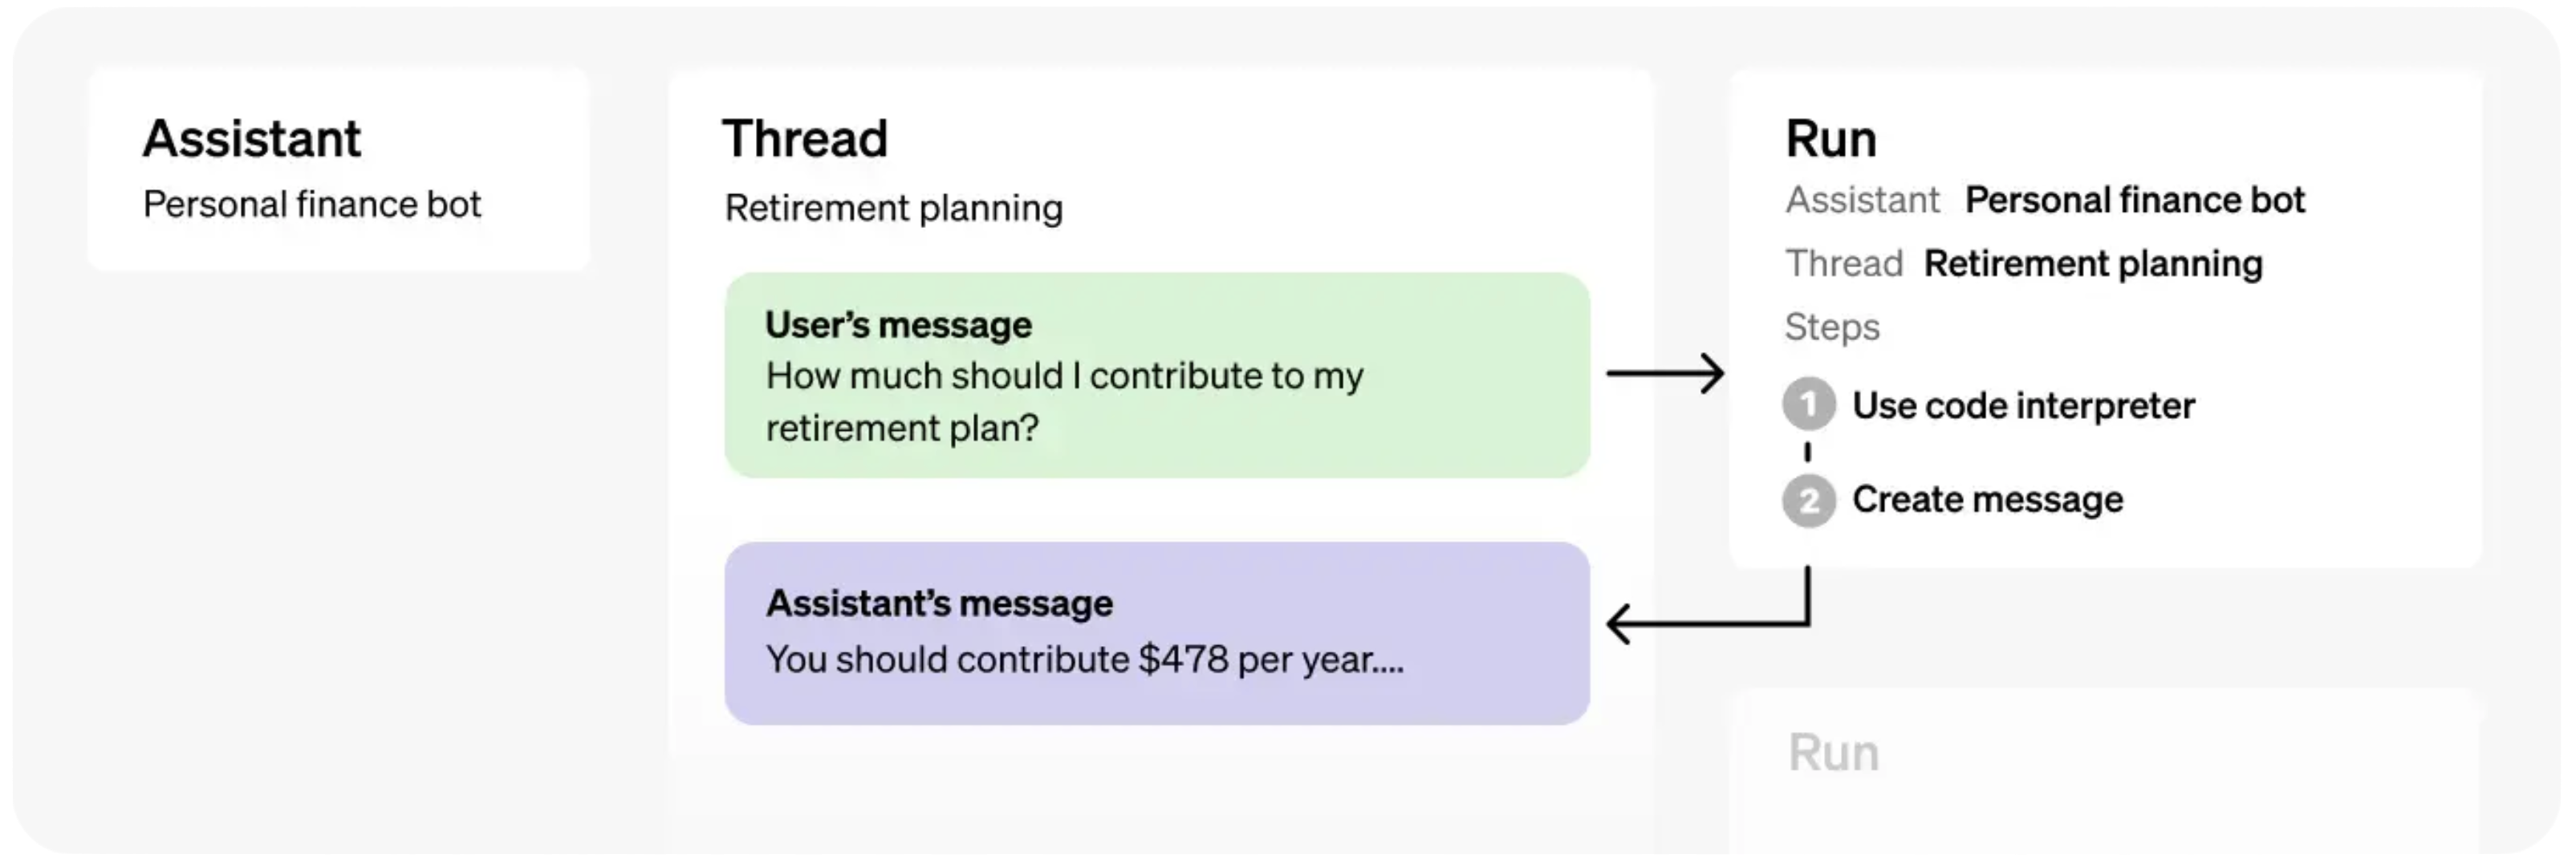
Assistants API的基本元素是:
- Assistants,封装了基本模型、指令、工具和(上下文)文档
- Threads,代表了对话的状态
- Runs,支持在线程上执行助手,包括文本响应和多步骤工具使用。
接下来一起看看怎么实际操作吧!
设置
python SDK
首先我们更新或者安装openai的SDK(本文撰写的时候是1.2.3版本)
!pip install --upgrade openai
然后我们看看安装得是不是最新版本
!pip show openai | grep Version
Pretty Printing Helper
import json

def show_json(obj):
    display(json.loads(obj.model_dump_json()))
完整Assistant API使用案例
Assistant
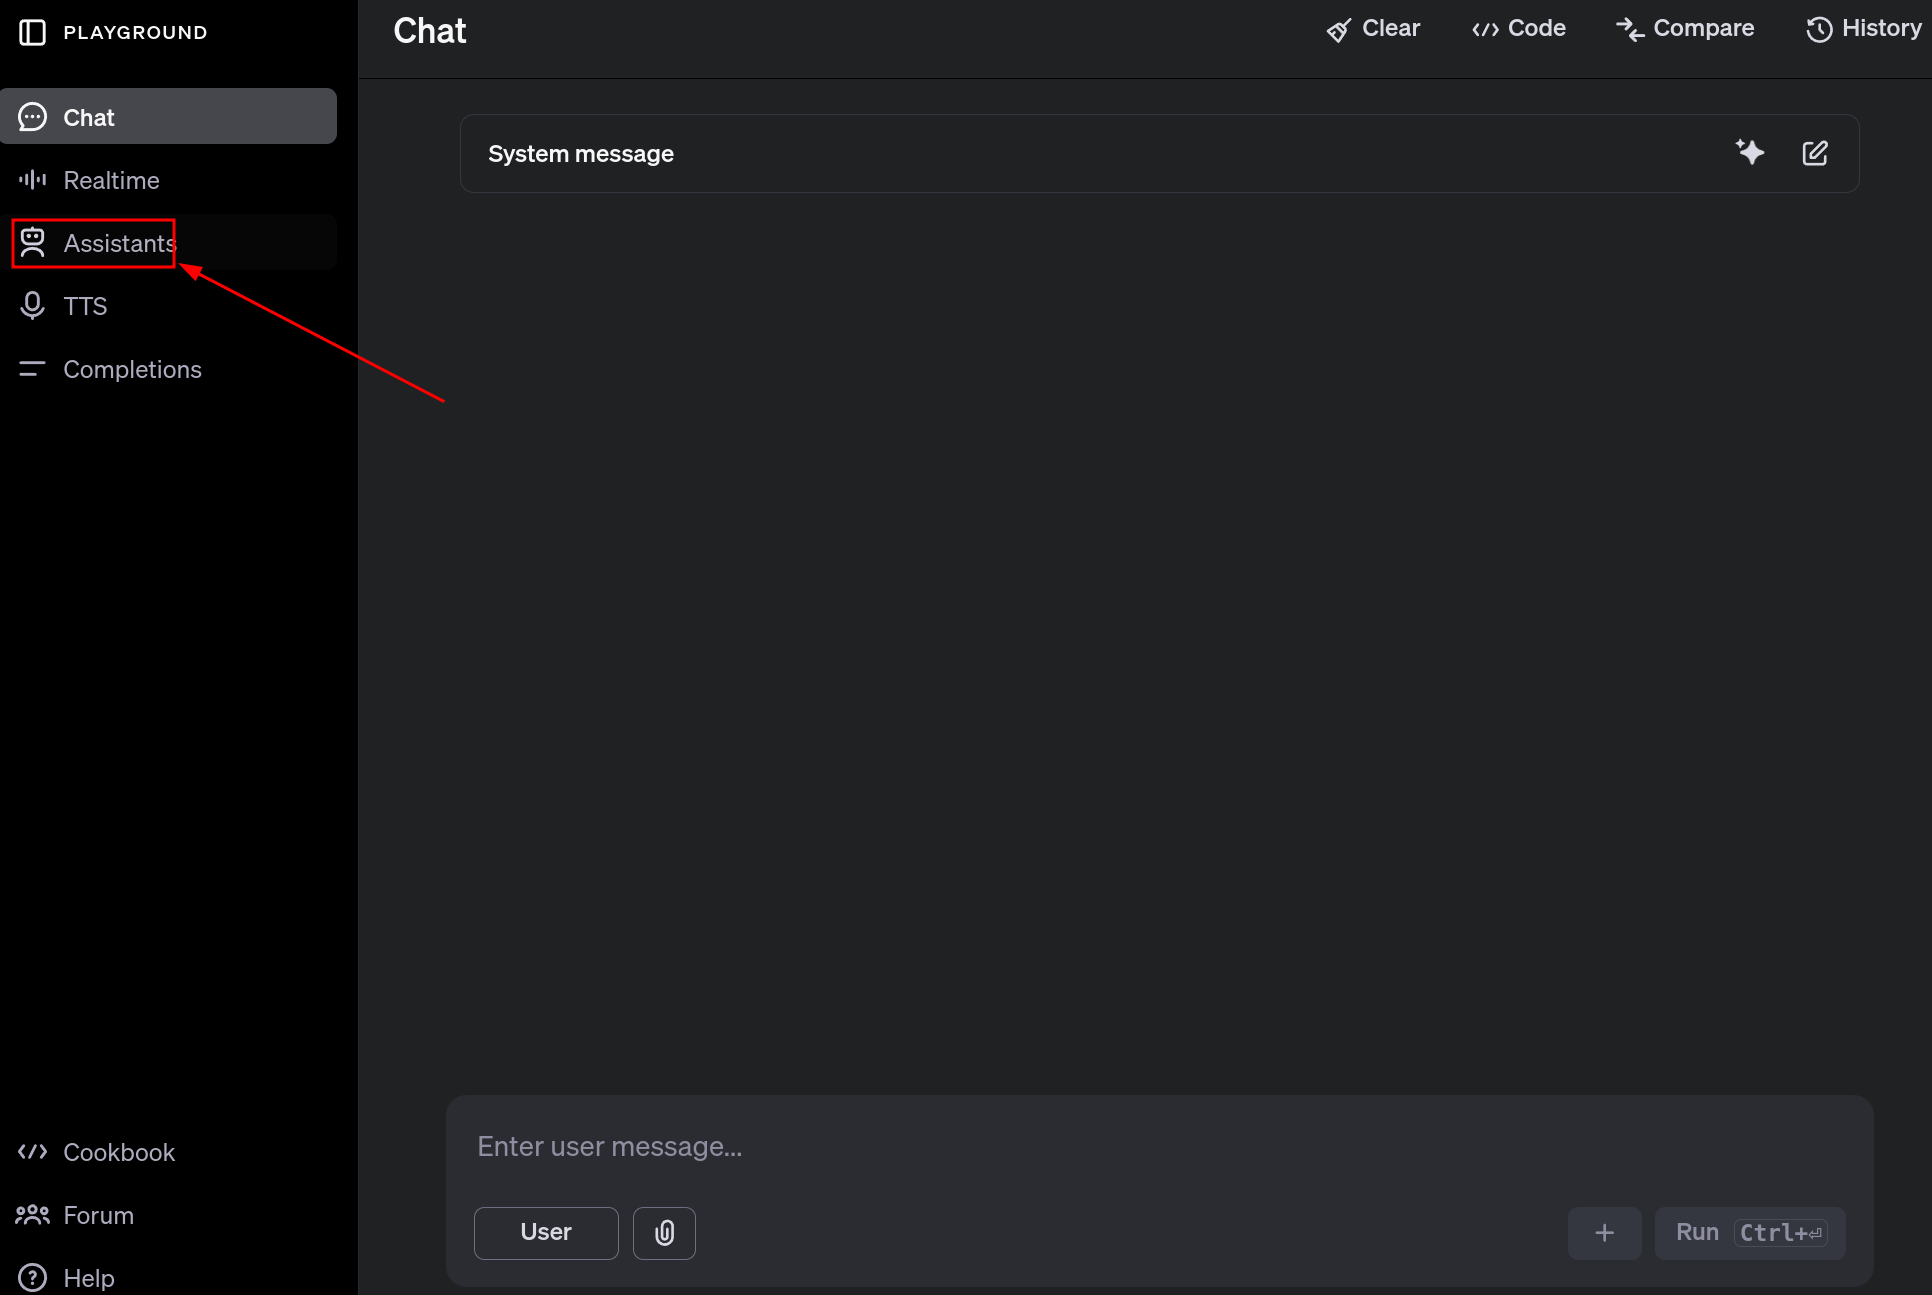
这是一个很好的学习Assistants API的地方Assistants Playground
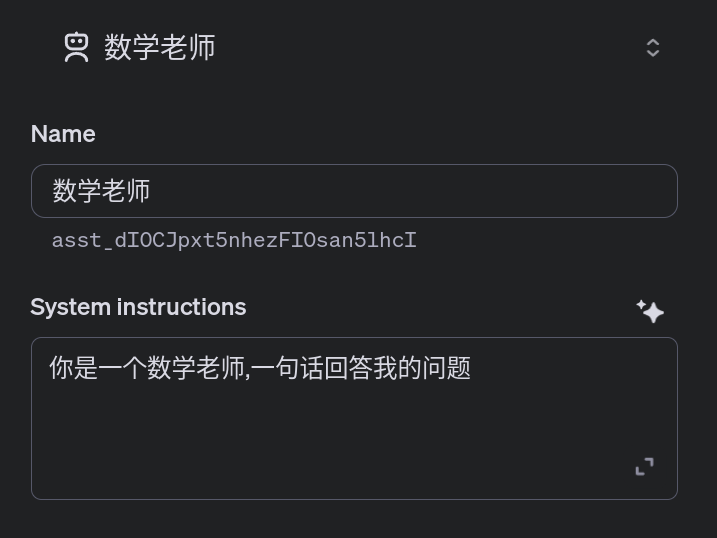
 设置一下我们的assistant

在这里看看我么创建的assistant,Assistants Dashboard.
当然我们也可以直接
from openai import OpenAI
import os

client = OpenAI(api_key=os.environ.get("OPENAI_API_KEY", "<your OpenAI API key if not set as env var>"))


assistant = client.beta.assistants.create(
    name="Math Tutor",
    instructions="You are a personal math tutor. Answer questions briefly, in a sentence or less.",
    model="gpt-4-1106-preview",
)
show_json(assistant)
无论是通过Dashboard还是API创建Assistant,都需要跟踪Assistant ID。这是我们在Threads和Runs中引用Assistant的方式。
接下来,我们将创建一个新的Thread并添加一条Message到其中。这样可以保存我们的对话状态,以免每次都需要重新发送整个消息历史。
评论:空列表[]
Threads
创建新的thread
thread = client.beta.threads.create()
show_json(thread)
然后我们添加Message到Thread中
message = client.beta.threads.messages.create(
    thread_id=thread.id,
    role="user",
    content="I need to solve the equation `3x + 11 = 14`. Can you help me?",
)
show_json(message)
注意:即使不再每次发送整个历史记录,我们仍将为每次运行的整个对话历史记录中的tokens付费。
RUNS
注意,我们创建的线程与之前创建的助手无关!线程与助手是独立存在的,这可能与使用ChatGPT(其中线程与模型绑定)不同。
要从Assistant中获取特定Thread的完成结果,我们必须创建一个Run。创建一个Run将指示Assistant查看Thread中的消息并采取行动:要么添加一个单独的响应,要么使用工具。
注意:Run是 Assistants API 和 Chat Completions API 之间的一个关键区别。在 Chat Completions 中,模型只会响应一个单独的消息(返回一条信息,只能调用一次tooluse),而在 Assistants API 中,一个运行可能会导致助手使用一个或多个工具,并可能在会话线程中添加多条消息。
要让我们的助手响应用户,我们需要创建一个 Run。如前所述,必须同时指定Assistants和Thread。
run = client.beta.threads.runs.create(
    thread_id=thread.id,
    assistant_id=assistant.id,
)
show_json(run)
与在 Chat Completions API 中创建完成不同,创建 Run 是一个异步操作。它将立即返回 Run 的元数据,包括一个状态,该状态最初将设置为queued。状态将在助手执行操作(如使用工具和添加消息)时更新。
为了知道Assistant何时完成处理,我们可以在循环中轮询 Run。 (流支持即将推出!评论:已经推出了)虽然这里我们只检查排队或正在进行的状态,但实际上,Run 可能会经历各种状态变化,您可以选择向用户显示这些状态。 (这些被称为步骤,将在后面介绍。)

评论:下面的是用来检索run对象的status
import time

def wait_on_run(run, thread):
    while run.status == "queued" or run.status == "in_progress":
        run = client.beta.threads.runs.retrieve(
            thread_id=thread.id,
            run_id=run.id,
        )
        time.sleep(0.5)
    return run
run = wait_on_run(run, thread)
show_json(run)
Messages
现在运行已经完成,我们可以列出线程中的消息,以查看助手添加了什么。
messages = client.beta.threads.messages.list(thread_id=thread.id)
show_json(messages)
消息按反向时间顺序排列 - 这样做是为了确保最新的结果始终在第一页(因为结果可以分页)。请注意这一点,因为这与 Chat Completions API 中的消息顺序相反。
我们来问问我们的助手,进一步解释一下结果吧!
# Create a message to append to our thread
message = client.beta.threads.messages.create(
    thread_id=thread.id, role="user", content="Could you explain this to me?"
)

# Execute our run
run = client.beta.threads.runs.create(
    thread_id=thread.id,
    assistant_id=assistant.id,
)

# Wait for completion
wait_on_run(run, thread)

# Retrieve all the messages added after our last user message
messages = client.beta.threads.messages.list(
    thread_id=thread.id, order="asc", after=message.id
)
show_json(messages)
这可能感觉像是为了得到一个回应而需要经过很多步骤,尤其是对于这个简单的例子。然而,你很快就会看到我们如何在几乎不改变代码的情况下为我们的助手添加非常强大的功能!
Example
我们来看看如何将所有这些组合在一起。下面是使用创建的助手所需的所有代码。
由于我们已经创建了 Math Assistant,我们已经将其 ID 保存在 MATH_ASSISTANT_ID 中。然后我定义了两个函数:
submit_message:在一个Thread中创建一条Message,然后启动(并返回)一个新的Run
get_response:返回一个Thread中的消息列表
from openai import OpenAI

MATH_ASSISTANT_ID = assistant.id  # or a hard-coded ID like "asst-..."

client = OpenAI(api_key=os.environ.get("OPENAI_API_KEY", "<your OpenAI API key if not set as env var>"))

def submit_message(assistant_id, thread, user_message):
    client.beta.threads.messages.create(
        thread_id=thread.id, role="user", content=user_message
    )
    return client.beta.threads.runs.create(
        thread_id=thread.id,
        assistant_id=assistant_id,
    )


def get_response(thread):
    return client.beta.threads.messages.list(thread_id=thread.id, order="asc")
我们还定义了一个create_thread_and_run函数,可以重复使用(实际上与我们的API中的client.beta.threads.create_and_run复合函数几乎相同:))。最后,我们可以将每个模拟用户请求提交到一个新的Thread。
请注意,这些 API 调用都是异步操作;这意味着我们实际上在代码中实现了异步行为,而无需使用异步库(例如 asyncio)!
def create_thread_and_run(user_input):
    thread = client.beta.threads.create()
    run = submit_message(MATH_ASSISTANT_ID, thread, user_input)
    return thread, run


# Emulating concurrent user requests
thread1, run1 = create_thread_and_run(
    "I need to solve the equation `3x + 11 = 14`. Can you help me?"
)
thread2, run2 = create_thread_and_run("Could you explain linear algebra to me?")
thread3, run3 = create_thread_and_run("I don't like math. What can I do?")

# Now all Runs are executing...
一旦所有的运行都开始了,我们就可以等待每一个并获取响应。
import time

# Pretty printing helper
def pretty_print(messages):
    print("# Messages")
    for m in messages:
        print(f"{m.role}: {m.content[0].text.value}")
    print()


# Waiting in a loop
def wait_on_run(run, thread):
    while run.status == "queued" or run.status == "in_progress":
        run = client.beta.threads.runs.retrieve(
            thread_id=thread.id,
            run_id=run.id,
        )
        time.sleep(0.5)
    return run


# Wait for Run 1
run1 = wait_on_run(run1, thread1)
pretty_print(get_response(thread1))

# Wait for Run 2
run2 = wait_on_run(run2, thread2)
pretty_print(get_response(thread2))

# Wait for Run 3
run3 = wait_on_run(run3, thread3)
pretty_print(get_response(thread3))

# Thank our assistant on Thread 3 :)
run4 = submit_message(MATH_ASSISTANT_ID, thread3, "Thank you!")
run4 = wait_on_run(run4, thread3)
pretty_print(get_response(thread3))
这段代码实际上并不特定于我们的数学助手,只需更改助手 ID,这段代码就可以适用于创建的任何新助手! 这就是 Assistants API 的强大之处。
Tools
Assistants API 的一个关键功能是能够为我们的助手配备工具,如Code Interpreter, Retrieval, and custom Functions。让我们逐一看看。
Code Interpreter
我们在Dashboard可以跟我们的assistant装备Code Interpreter这个函数.

或者是API设置一个
assistant = client.beta.assistants.update(
    MATH_ASSISTANT_ID,
    tools=[{"type": "code_interpreter"}],
)
show_json(assistant)
现在我们用用这个新工具!
thread, run = create_thread_and_run(
    "Generate the first 20 fibbonaci numbers with code."
)
run = wait_on_run(run, thread)
pretty_print(get_response(thread))
这样就完成了!Assistant在后台使用了Code Interpreter,并给出了最终的响应。
在某些使用场景中,这可能足够了——但是,如果我们想了解助手正在做什么的更多细节,我们可以查看Run。
Steps
一次Run由一个或多个Steps组成。与一次Run一样,每个Step都有一个status,可以进行查询。这对于向用户展示Step的进度很有用。
run_steps = client.beta.threads.runs.steps.list(
    thread_id=thread.id, run_id=run.id, order="asc"
)
我们来逐一查看每个Step的step_details。
for step in run_steps.data:
    step_details = step.step_details
    print(json.dumps(show_json(step_details), indent=4))
我们可以看到两个Steps的step_details:
1.tool_calls(在单个步骤中可能有多个)
2.message_creation
第一步是tool_calls,具体来说是使用包含以下内容的code_interpreter:
input,即在调用工具之前生成的Python代码,以及
output,即运行代码解释器的结果。
第二步是message_creation,其中包含了添加到Thread中的message,以便向用户传达结果。
Retrieval
Assistants API 中的另一个强大工具是Retrieval:上传文件的能力,助手将使用这些文件作为知识库来回答问题。也可以从Dashboard或 API 中启用此功能,我们可以上传想要使用的文件。
# Upload the file
file = client.files.create(
    file=open(
        "data/language_models_are_unsupervised_multitask_learners.pdf",
        "rb",
    ),
    purpose="assistants",
)
# Update Assistant
assistant = client.beta.assistants.update(
    MATH_ASSISTANT_ID,
    tools=[{"type": "code_interpreter"}, {"type": "retrieval"}],
    file_ids=[file.id],
)
show_json(assistant)
thread, run = create_thread_and_run(
    "What are some cool math concepts behind this ML paper pdf? Explain in two sentences."
)
run = wait_on_run(run, thread)
pretty_print(get_response(thread))
**注意:检索中还有更多细节,如Annotations,这些可能会在另一cookbook中介绍。
Functions
作为Assistant的最后一个强大工具,您可以指定自定义函数(类似于聊天完成 API 中的函数调用)。在运行期间,助手可以指示它想要调用指定的一个或多个函数。然后,你负责调用该函数,并将输出返回给助手。
我们来看一个例子,通过定义一个display_quiz()函数来为我们的Math Tutor创建一个展示测验的功能。
这个函数将接受一个title和一个问题组,展示测验,并为每个问题获取用户的输入:
titlequestionsquestion_textquestion_type: [MULTIPLE_CHOICE,FREE_RESPONSE]choices: ["choice 1", "choice 2", ...]
我们设计两个模拟函数,用来模拟用户输入.
def get_mock_response_from_user_multiple_choice():
    return "a"


def get_mock_response_from_user_free_response():
    return "I don't know."


def display_quiz(title, questions):
    print("Quiz:", title)
    print()
    responses = []

    for q in questions:
        print(q["question_text"])
        response = ""

        # If multiple choice, print options
        if q["question_type"] == "MULTIPLE_CHOICE":
            for i, choice in enumerate(q["choices"]):
                print(f"{i}. {choice}")
            response = get_mock_response_from_user_multiple_choice()

        # Otherwise, just get response
        elif q["question_type"] == "FREE_RESPONSE":
            response = get_mock_response_from_user_free_response()

        responses.append(response)
        print()

    return responses
这是一个样本的样子:
responses = display_quiz(
    "Sample Quiz",
    [
        {"question_text": "What is your name?", "question_type": "FREE_RESPONSE"},
        {
            "question_text": "What is your favorite color?",
            "question_type": "MULTIPLE_CHOICE",
            "choices": ["Red", "Blue", "Green", "Yellow"],
        },
    ],
)
print("Responses:", responses)
现在,让我们用 JSON 格式定义这个函数的接口,以便我们的助手可以调用它:
function_json = {
    "name": "display_quiz",
    "description": "Displays a quiz to the student, and returns the student's response. A single quiz can have multiple questions.",
    "parameters": {
        "type": "object",
        "properties": {
            "title": {"type": "string"},
            "questions": {
                "type": "array",
                "description": "An array of questions, each with a title and potentially options (if multiple choice).",
                "items": {
                    "type": "object",
                    "properties": {
                        "question_text": {"type": "string"},
                        "question_type": {
                            "type": "string",
                            "enum": ["MULTIPLE_CHOICE", "FREE_RESPONSE"],
                        },
                        "choices": {"type": "array", "items": {"type": "string"}},
                    },
                    "required": ["question_text"],
                },
            },
        },
        "required": ["title", "questions"],
    },
}
我们再次更新助手,可以通过Dashboard或API来进行。
将函数JSON粘贴到Dashboard上有点麻烦,因为缩进等问题。我们可以让ChatGPT将函数格式化为仪表板上的示例之一。
assistant = client.beta.assistants.update(
    MATH_ASSISTANT_ID,
    tools=[
        {"type": "code_interpreter"},
        {"type": "retrieval"},
        {"type": "function", "function": function_json},
    ],
)
show_json(assistant)
现在,我们来做个测验。
thread, run = create_thread_and_run(
    "Make a quiz with 2 questions: One open ended, one multiple choice. Then, give me feedback for the responses."
)
run = wait_on_run(run, thread)
run.status
现在,我们检查Run的status时,却发现需要requires_action!让我们仔细看看。
show_json(run)
required_action表明工具正在等待我们运行它并将其输出提交给Assistant。具体来说,就是display_quiz函数!让我们从解析函数名和参数开始。
注意:虽然在这种情况下我们知道只有一次工具调用,但在实际应用中,Assistant可能会选择调用多个工具。
# Extract single tool call
tool_call = run.required_action.submit_tool_outputs.tool_calls[0]
name = tool_call.function.name
arguments = json.loads(tool_call.function.arguments)

print("Function Name:", name)
print("Function Arguments:")
arguments
现在我们实际调用带有Assistant提供的参数的display_quiz函数:
responses = display_quiz(arguments["title"], arguments["questions"])
print("Responses:", responses)
太好了!(记住,这些回应是我们之前模拟的。在现实中,我们会从后端获取这个函数调用的输入。)
现在我们已经有了响应,让我们将它们提交回Assistant。我们需要tool_call ID,在我们之前解析的tool_call中可以找到。我们还需要将响应list编码为字符串。
run = client.beta.threads.runs.submit_tool_outputs(
    thread_id=thread.id,
    run_id=run.id,
    tool_outputs=[
        {
            "tool_call_id": tool_call.id,
            "output": json.dumps(responses),
        }
    ],
)
show_json(run)
我们现在可以再次等待 Run 完成,并检查我们的Thread!
run = wait_on_run(run, thread)
pretty_print(get_response(thread))
牛了!!
总结
我们在这本笔记中涵盖了很多内容,给自己一个大拇指!希望现在你已经拥有了使用工具如Code Interpreter, Retrieval, and Functions坚实基础!
附录
There's a few sections we didn't cover for the sake of brevity, so here's a few resources to explore further:
- Annotations: parsing file citations
- Files: Thread scoped vs Assistant scoped
- Parallel Function Calls: calling multiple tools in a single Step
- Multi-Assistant Thread Runs: single Thread with Messages from multiple Assistants
- Streaming: coming soon!
Now go off and build something amazing!